Monday, January 31, 2011

Meatless Monday

Why Monday?

For most Americans the week begins on Monday. On Monday, we move from the freedom of the weekend back to the structure of work or school. We set our intentions for the next six days. We plan ahead and have a schedule. From an early age we internalize this rhythm. And studies suggest we are more likely to maintain behaviors begun on Monday throughout the week. That makes Monday the perfect day to make a change for your health and the health of our planet.

Monday is the call to action built in to every calendar each week. And if this Monday passes you by, next week is another chance to go meatless!

Going meatless once a week may reduce your risk of chronic preventable conditions like cancer, cardiovascular disease, diabetes and obesity. It can also help reduce your carbon footprint and save precious resources like fresh water and fossil fuel.

This week I will share with you a very simple, yet delicious Indian Stew. I hope that trying this recipe will inspire you to follow me in my journey of making Monday Meatless. I will share a new Meatless recipe every Monday, and as always it will also be Gluten Free.


Simple Indian Chickpea Stew
A thick vegetarian stew made from pantry staples, such as rice, spices, and canned chickpeas, is enlivened with a bit of yogurt and lime.

Easiest Indian Stew

Ingredients

Serves 4
  • 1 cup long-grain white rice
  • 2 tablespoons vegetable oil, such as safflower
  • 1 medium onion, minced
  • 2 garlic cloves, finely chopped
  • Coarse salt and ground pepper
  • 1 tablespoon garam masala* (a good quality curry powder may be substituted)
  • 1/2 teaspoon fresh ginger, grated (1 tsp. ground ginger may also be substituted.
  • 3 cups  tomato puree, I really like the San marzano Brand
  • 2 cans (15 ounces each) chickpeas, rinsed and drained
  • 1 tablespoon fresh lime juice, plus lime wedges for garnish
  • 1/2 cup plain low-fat yogurt

Directions

  1. Cook rice according to package instructions; cover, and keep warm.
  2. While rice is cooking, heat oil over medium heat in a large skillet. Add onion and garlic; season with salt and pepper. Cook, stirring frequently, until onion is tender, 4 to 6 minutes. Add garam marsala and ginger; cook, stirring, until fragrant, about 1 minute.
  3. Add tomato puree, chickpeas, and 1 1/2 cups water. Bring to a boil; reduce to a simmer, and cook, stirring occasionally, until thickened, 8 to 10 minutes. Stir in lime juice; season with salt and pepper. Serve stew with rice and yogurt, garnished with lime wedges and a pinch of garam marsala.
*http://en.wikipedia.org/wiki/Garam_masala

Tonight we are having this delicious stew with a side of sauteed spinach. Simply, 2 lbs of  fresh spinach leaves sauteed in olive oil, with fresh garlic, sea salt and cracked black pepper. That's it. Cheers....

Saturday, January 29, 2011

Crustless Coconut Pie

Do you love Coconut? How about custard? Then this is the pie for you. A Creamy, coco nutty, heavenly treat, so easy to make, so delicious and Gluten Free to top it off.

My comfort when not feeling so uppity is to bake. It is like therapy for the soul. There is something about the smell of fresh baked goods that can lift anyone's spirit.

Crustless pies, you ask?, nobody is going to miss the crust. I mean look at this pie again … does it look like it’s lacking anything? I didn’t think so.

 Here’s the recipe:

The recipe is adapted from the Gluten Free Easily recipe, with my own slight changes.

3 large (or extra large) eggs
1 cup granulated sugar
1/3 cup flour*
1 cup milk,(rice milk or almond milk work just as well)
1/4 cup butter, melted
1/4 cup Coconut Oil
1 tsp vanilla
1 tsp apple cider vinegar
1 ½ cup coconut flakes
Preheat oven to 350 degrees Fahrenheit.
Beat eggs and sugar. Add flour, milk, butter, coconut oil, vanilla, and vinegar; mix well. Stir in coconut and pour into greased pie pan. Bake until the top is golden and the filling is set in the center, about 45 minutes. Serve at room temperature. Store any leftovers in your refrigerator.
*I use a variety of all-purpose gluten-free flour mixes, but you can use whichever flour you prefer for baked goods. For this recipe I used 2 parts Bob's Red Mill GF All purpose flour mix and 1 part almond flour. I like the texture of the almond flour. I would normally use Better Batter All Purpose flour, but I am currently out of it.  (If you are not gluten free, use your “standard” all-purpose flour.)

Thursday, January 27, 2011

A Hidden Puerto Rican Gem in San Rafael, California

If you find yourself in the city of San Rafael, don’t miss a trip to SOL FOOD, Puerto Rican Cuisine. Whether or not you eat gluten-free, this eatery has plenty to offer. The Beef is all natural, the Chicken is Free Range, all the salads are organic. They offers several Vegan options and almost everything on the menu is offered Wheat Free.

On my first trip to SOL FOOD, I sampled two of the dishes off the vast menu. The first came recommended by the young lady at the register, the Tostones con queso, 5 tostones (green plantains, fried, smashed and fried again, topped with melted jack cheese and mojo (a garlic and olive oil blend), you may add fresh tomatoes or avocado to top this off. My second dish was the A La Carte, polo, (Boneless skinless Free Range Chicken thighs marinated with oregano and garlic, then baked. I also got a side of the most amazing black beans and rice. The black beans were simmered with peppers, onions and cilantro. I was in heaven. The portions are very generous and it is a great place to order several items and spilt them among your friends.


If you haven't been to Sol Food, it's owned by Sol Hernandez, an enterprising San Rafael native who decided to bring Puerto Rican food to Marin. She lived on the island for quite awhile with her boyfriend and his mother and spent her free time learning how to cook the local dishes. The original Sol Food is a tiny little almost shack like place on the corner of 4th and Lincoln in San Rafael. There aren't any formal indoor tables although there are stools by the window and up by the counter. Locals differentiate between the two in size, calling the original location on 4th Street "the small one", some I would dream of, if I visited Puerto Rico and the second location on Lincoln Avenue, more sit down restaurant. Now they have monopolized the Peurto Rican Restaurant scene in San Rafael, if they would only branch out to Sonoma County, we'd be talking. Maybe I'm partial because I live in Sonoma County. The drive to San Rafael for SOL FOOD is worth it.
Regardless of which one you choose, Sol has successfully created two restaurants, almost three spaces that look and feel like Puerto Rico: colorful shutters and chairs, green plantains holding down stacks of napkins, and big leafy plants gracing every inch of usable counter space. Loud, lively music streams throughout the busy cafe, and one of the things I love the most are the communal tables (at the larger location). Here, you may be seated next to a teacher grading papers, an older man reading the paper, employees on a break, and tattoo artists from down the street. There aren't a lot of places around Marin where young and old, conservative and liberal, come together and chat over pink beans and rice.

If you are lucky enough to live near by, they deliver, too........

http://www.solfoodrestaurant.com/

Sol Food, Cafe (Small One/Original)
732 4th Street
San Rafael, CA 94901
(415) 451-4765
Hours: Sun.-Thurs. 7am-12am; Fri. 7am-2am; Sat. 8am-2am
Sol Food Restaurant (Big One)
903 Lincoln Avenue
San Rafael, CA 94901
(415) 451-4765 (same number as above)
Hours: Daily from 11am-10pm

Tuesday, January 25, 2011

The Dreaded Cold

For the past few weeks, I have had the dreaded winter cold. This cold lingered and lingered, congestion, cough, worse in the morning and at night. I was functional, still doing my daily list of duties. After 3 weeks, the fever kicked in, as well as a deepened chest cough, more congestion, stuffy head. Time for the Dr. and my antibiotics and cough medicine. Still got to be a mommy, still got to cook.

There is one thing and one thing ONLY that can make a cold go away quickly.

pot to make chicken soup.

It can’t be purchased at any normal store, nor is it a quick fix… but I promise. It works.
It’s something that goes back generations, and I can guarantee you that most Jewish women have a pot that’s specifically designed to make their “penicillin”.
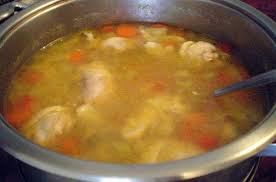
This, my friends, is Jewish Penicillin… a.k.a. chicken soup. A Childhood memory, comfort food with amazing healing powers.

chicken soup,


  • 1 whole chicken, skinned* (It is not necessary to skin the chicken, I prefer to skin the chicken to lower the fat content)


  • 1 medium yellow onion, chopped


  • 8 carrots, peeled and cut into chunks


  • 1 parsnip, peeled cut into chunks


  • 3 ribs of celery, cut into chunks


  • 1 sweet potato, peeled and cut into chunks


  • 1 small bunch fresh dill weed, chopped


  • salt and pepper to taste


  • Directions

    1. Place skinned chicken into a large pot with the breast side down. Fill with enough cold water to reach about 3 inches from the top of the pot. Bring to a boil over medium high heat. Skim off any foam that comes to the top. Reduce heat to medium.
    2. Add the onion, carrot, parsnip, sweet potato, celery and dill. Bring to a simmer over medium heat, and cook, partially covered for 2 hours. Do not let the soup boil. Partially cover, and simmer for another 2 hours for best flavor.
    3. Remove chicken from the pot, using a large slotted spoon. Set aside to cool, until able to handle. Remove chicken from the bones and cut into bite sized pieces. Return to the pot.
    4. May be served as is, or with your favorite noodles or rice, I like to use brown rice fussili.
    Yummy.......
    Chicken & Rice Soup


    * To skin a chicken:


  • Place a whole raw chicken with the breasts facing down.


  • Slice through the skin along the backbone.


  • Cut off the wings at the first joint.


  • Cut around the end of each drumstick to loosen the skin from the legs.


  • Carefully peel the skin away from the chicken, starting with the cut you made at the backbone.


  • Cut or pull the skin from the breastbone.


  • Skin a single piece of raw chicken by grasping one end of the skin firmly and pulling.


  • Sunday, January 23, 2011

    The Quest for a Gluten Free Crab Cake

    All winter long it is Dungeness Crab season in Northern California. Living just 30 minutes from Bodega Bay, I find myself so very lucky. What is better than fresh crab, just off the boats, still warm from the crab pot. On this beautiful 70 degree day in the middle of January while the majority of the US is experiencing a major freeze, I decide to take my dog Jackson to the beach and also pick up some fresh crab.
    I pack up the car, with a picnic lunch, a blanket and Jackson. Our destination is Doran State Park, located in Bodega Bay California, followed by a short drive to Spud Point for the crab and the Bodega Heads, hoping to catch the glimpse of a migrating whale. Besides being an unseasonably warm winter day and loving the sound of crashing waves, the real reason for this trip to get some fresh crab, to satisfy my craving for crab cakes. I have not had a crab cake since starting my Gluten Free journey and knew that I used to make a mean gluten packed crab cake so why not make one Gluten Free. I can do this and I don't want crab from the store or from a can, I want fresh local, warm crab, since it is available and so close to home.

    Doran Beach, Bodega Bay, California


    My dog, Jackson. He's just as excited about this sunshine, as I am.

    Beautiful Sunny Mid-January Day

    My lunch, Red Quinoa Greek Salad

    What a perfect day, Now that I have soaked in some sunshine, let's walk the beach and check out the fishing enthusiasts and some facts about Bodega Bay..

    What's in the cooler? Crab?

    Crabbers and those trying to fish off the rocks.

    A few bit more experienced fishermen.... What will they catch?

    A few facts.....
    Back to the car and head North on Hwy 1, towards the Bodega Head and Spud Point Crab Company

    Fresh Dungeness Crab, Still warm


    A crab cage....

    I got my 2 fresh, warm and local crabs. Now to get home and clean, crack and pick out all the succulent meat. A messy but fun part of the crab experience. Just make sure that the take the garbage out afterwards. They can be stinky.....

    Cleaning and picking the bodies first, then tacking the legs and claws
    It's a messy, but so worth it job...

    The sweet Crab meat


    Remember the mallet

    Let the creation begin, egg, mayonnaise, homemade Udi's bread crumbs, rice flour, dill,
    lemon juice, scallions, pepper, salt, hot sauce

    The first batch, fried in canola oil

    The last batch, almost done

    OK, Are you ready for the recipe?

    Gluten Free Crab Cakes


    Ingredients:
    • Crab meat, from 2, 2/12lb Dungeness Crabs, Yields approx. 20-24 oz. crab meat, picked through thoroughly, be careful not to get any shell.
    • 2, toasted slices of Udi's Whole grain Gluten Free Bread, chopped fine, for about 1/2 cup fresh bread crumbs, or 1/2 cup Gluten free bread crumbs of your choice.
    • 1 tbs. rice flour
    • 1 lemon cut into 4 wedges
    • 1 egg, slightly beaten
    • 1 scallion, chopped
    • 1/4 cup of all-natural mayonnaise (make sure it's GF)
    • 1/4 canola oil (any vegetable oil will work)
    • 1 tsp. dried dill or 1 Tbs. fresh chopped dill
    • 1/4 tsp. cayenne pepper
    • 1 dash hot sauce, such as Tabasco
    • Salt and pepper to taste
    Directions:
    1. Lightly mix the breadcrumbs, scallions, dill, cayenne, Tabasco, egg, mayonnaise, rice flour and 1 wedge of fresh squeezed lemon juice and crab meat together in a bowl until seasonings are well distributed.
    2. Separate the mixture into even-size portions and flatten/shape into about a 3" patty. Cover and chill for about 30 minutes in the fridge until they are firm. They're easier to cook when chilled.
    3. Heat the oil in a frying pan over medium heat and cook on each side until lightly browned (no more than 10 minutes).
    4. Serve with lemon wedges and your favorite tartar sauce or aoili
    Yield about 1 dozen crab cakes......


    Friday, January 21, 2011

    Chilean Sea Bass with Coconut Green Curry

    Curry, coconut milk and cilantro provide a burst of flavors in this exotic dish. Chilean sea bass (or any variety of white fish)  in this fresh take on the traditional Indian recipe. The mild flavor of the fish balances the spicy curry sauce for a mouthwatering taste.

    Chilean Sea Bass in Green Curry

    • 1 tbsp. canola oil
    • 1 red onion, chopped
    • 1 tbsp. green curry paste
    • 1 can light coconut milk, I really like the Trader Joe's brand 
    • 1/2 lb. green beans, trimmed and cut into 1.5-inch lengths
    • 1 1/2 lbs. Chilean sea bass (substitute striped bass, halibut or cod) fillet, skinned and boned
    • 1 1/2 cups jasmine rice, cooked according to package directions
    Heat oil over medium heat. Add red onion and saute until softened (three minutes). Stir in green curry paste and coconut milk. Reduce heat to low and simmer for five minutes. Add green beans and cook for two minutes. Add Chilean sea bass and simmer gently until cooked throughout, about five to eight minutes. Stir in the chopped cilantro. Transfer to a warmed platter and garnish with cilantro. Serve immediately with hot rice. Makes about 4 servings

    Thursday, January 20, 2011

    Hasselback Potatoes

    For the Potatoes:
    4 russet potatoes
    4 garlic cloves
    4 tablespoons unsalted butter
    coarse sea salt
    cracked black pepper
    3 tablespoons olive oil

    Preheat oven to 425 degrees F.

    Thinly slice garlic cloves.  Set aside.
    Rinse and scrub potatoes well.  We’re keeping the skin on so it’s gotta be clean.
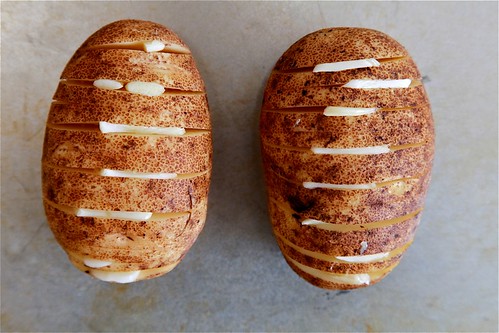
    Slice a thin layer off of the bottom of the potatoes.  This will give them a solid base to rest on to get sliced.  Slice into the potatoes but not completely through them.  Slice potatoes, creating very thin rounds connected at a base.  Slide garlic slices in between potato slices.  You might  actually need to shove them in… the potato might be pretty tight.  Just be careful not to tear the bottom.
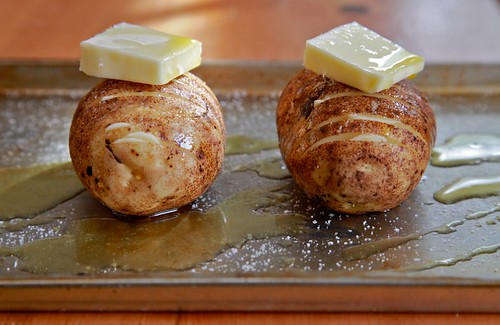
    Place potatoes on a baking sheet.  Generously sprinkle potatoes with salt and pepper.  Top each potato with one tablespoon of butter.  Drizzle with oil.  Bake for 1 hour or until tender on the inside and crisp on the outside.  Remove the pan about every 15 minutes to baste potatoes in the oil and butter on the pan.  This will make the skin crispy and delicious and the potato extra buttery.
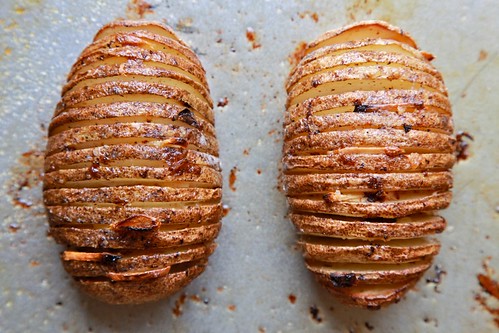
    When cooked through and crispy, remove from the oven, cool for 10 minutes.

    The potatoes, washed and dried....

    IMG_5789

    Slice the potatoes and place garlic between slices....

    IMG_5796

    Sprinkles with sea salt, black pepper, butter and olive oil....
    IMG_5814


    Voila, The finished potatoes.....
    IMG_5836

    So delicious.....Cheers

    Greek Quinoa Salad

    If you’ve never tried Quinoa or would like to know more about it, check here. Tabbouleh is traditionally made with bulgur, which is made from wheat. Quinoa gives a great nutty flavor and is great for those who can’t eat wheat.

    Today, while shopping at my favorite store, Trader Joes, my inspiration for lunch came to me. The sun is shining here in beautiful California, feeling more like Spring than Winter. What a better lunch than a protein and vegetable packed salad. I picked up a box of Gluten Free Organic Red Quinoa, a jar of pitted Kalamata Olives, some grape seed oil, an English cucumber, a red onion, a yellow bell pepper, cherry tomatoes and feta cheese.

    For the Salad:

    2 cups cooked and cooled Quinoa
    6 Kalamata olives, chopped
    1 English cucumber, washed and diced
    1/2 red onion, chopped
    1 yellow bell pepper, chopped
    12 cherry tomatoes, halved
    1/2 cup grape seed oil
    1/4 cup Gluten Free Red wine vinegar
    1/4 tsp. sea salt
    1/4 tsp. cracked pepper
    1/2 cup feta cheese, crumbled

    Notes: For this recipe, bring 2 cups water to a boil in a sauce pan. Add 1 cup quinoa and brought it back to a boil. Then cover, lower heat to medium and cook until water is fully absorbed by the quinoa, about 12+ minutes. Take it off the heat, fluff it up, cover again, and let it stand.

    Toss cooled Quinoa with the chopped vegetables. Combine the oil and vinegar, whisk with salt and pepper. Pour over Quinoa and vegetables. Fold to blend. Top with feta cheese and lightly blend.

    This salad will stay fresh for several days in an airtight container in the refrigerator.

    Cheers and enjoy.........

    Kikkoman's offers new Gluten Free Soy Sauce

    Kikkoman joins San-J and LaChoy with a new Gluten Free Soy Sauce now available on store shelves.
    Kikkoman Gluten-Free Soy Sauce is naturally brewed from four all-natural ingredients, like legendary Kikkoman Soy Sauce. However, the traditional wheat is replaced with rice, creating rich brewed notes and a complex, pleasing aroma. Through the natural brewing process, Kikkoman Gluten-Free Soy Sauce develops a mellow flavor that enhances umami and blends seamlessly with other ingredients, without masking or overpowering them.
    The new sauce is:
    • Gluten-free: Produced in accordance with FDA mandatory guidelines for a gluten-free declaration; thoroughly tested for gluten and other quality parameters.
    • Versatile: Enables chefs to offer a wider range of Asian and global menu items to customers with gluten-restricted diets.
    • Low in calories; zero fat
    Kikkoman suggests you use to season stirfries, soups, stews, entrées, appetizers and grilled foods, during or after cooking.
    Ingredients: WATER, SOYBEANS, RICE, SALT.
    See Kikkoman’s New Products Page here.

    http://glutenfreeville.com/research/kikkoman-offers-new-gluten-free-soy-sauce

    Wednesday, January 19, 2011

    National Popcorn Day


    Today is January 19, which is also National Popcorn Day. In order to assist in you celebrating I have decided that I will share with you my newest favorite recipe. Whether you like your popcorn air-popped, oil popped, buttered or just salted, microwaved or pre-packaged from the store, popcorn is popcorn and can be flavored in so many ways from the basic to the gourmet. My favorite popcorn is Kettle corn, a bit sweet and salty. Popcorn is also naturally gluten-free and can be a healthy snack. So tonight while you are finally able to relax for the night, pop yourself some popcorn and enjoy National Popcorn Day.

    Now, I have to admit I normally just grab a bag of popcorn and stick it in the microwave, so easy and so delicious. I love popcorn.

    My latest popcorn addiction is courtesy of Joy the Baker, and her recipe for Maple Bacon Kettle Corn. Wait a minute. Did I say, Maple and Bacon and Kettle corn. What could be better....

    4 slices bacon, cooked, fat reserved
    1 tablespoon maple syrup
    1/2 cup corn kernels
    1/4 cup cooking fat (use the reserved bacon fat and extra olive or vegetable oil to make 1/4 cup of popcorn cooking fat)
    3 Tablespoons sugar
    1 1/2 to 2 teaspoons salt (depending on your taste)

    Cook off bacon until brown and crisp.  Set aside to cool.  Once cool, chop into small bits and toss with maple syrup.

    Carefully measure out the hot bacon grease.  If you don’t have 1/4 cup of fat, add some vegetable or canola oil to make 1/4 cup of oil for cooking the popcorn.

    In a large pan over medium high heat, heat the bacon fat and oil mixture.  Add the corn kernels.  Sprinkle over the sugar and 1 teaspoon of salt.  Cover the pan with a tight fitting lid and wait for the popping to begin.
    Once the popping begins, use two good pot holders the hold together the pan and the lid and shake the pot.  Feel free to take the pot off the flame to give it a good shake.  Just be careful and then return the pot to the flame.  Shake often throughout the popping process.  This will help ensure that the sugar doesn’t burn the pan and the popcorn.

    Once finished popping remove the lid and salt with 1/2 to 1 teaspoon more salt.  Use a large spoon to stir the popcorn.  You don’t want the hope sugar to burn you.  Pour in the bacon and maple mixture.  Toss together and serve.

    Tuesday, January 18, 2011

    Taco Tuesday

    Do you often find yourself with the dreaded question, What's for Dinner? Like most families we are busy with our lives, whether it be work, school, kids, volunteering, or just plain life. We all need to eat dinner. I try to simplify this as much as possible and to do this I try to pick themes for the week. Monday is Meatless Monday, Tuesday is Taco Tuesday, Wednesday is Pasta Day, Thursday is Breakfast for dinner, Friday is Pizza and I let the weekends be whatever we feel, sometimes BBQ, sometimes takeout, sometimes Seafood. Well today is Tuesday so it is Taco Tuesday. I change the Taco variation weekly, from Vegetarian Bean Tacos, to Fish Tacos, to Turkey Tacos, to Taco Casserole the variety of Taco's is endless, so you won't get bored with the same week after week scenario. Today is Chile Verde Tacos. I being the morning by getting out the crock pot and letting the Chile Verde cook, low and slow all day. I served it with organic corn tortillas, brown rice, whole pinto beans and a salad. There are always leftovers, which I freeze for another meal.

    Chile Verde:

    5 lb Pork, shoulder, loin or butt, trimmed of fat and cut into large chunks. *
    1 jar GF Salsa Verde, I like the jarred variety from Trader Joe's.
    1 large onion, chopped
    2 cloves garlic, chopped
    1 medium tomato, chopped
    1/4 cup cilantro, chopped
    salt and pepper, to taste
    Canola or vegetable oil, for browning the pork

    Season pork with salt and pepper, in a large skillet over medium high heat, brown pork in a small amount of oil. You will need to work in batches to avoid over crowding the pan. Add chopped onion, garlic and tomato to crock pot and top with browned pork. Pour 1 cup of the Salsa Verde over the pork. Slow Cook for 8-10 hours on low or 5-6 hours on high. Until meat is tender and falling apart. At this point you can shred the meat and keep on warm until ready to serve.

    Serve with warmed corn tortillas, steamed brown rice, whole pinto beans and a salad.

    This is also delicious just served in a bowl over rice with a salad on the side, a great variety.

    Enjoy and Happy Tuesday...........

    * If you are not pork eaters this recipe can easily be adapted using boneless, skinless chicken breasts and thighs. It is important to use a combination of white and brown meat due to the fat content and the long cooking process.

    Sunday, January 16, 2011

    Sunday Night Dinner

    Well the end of the weekend is here and what a better way to enjoy the evening than with a delicious meal. Naturally Gluten Free is the way to go. On tonight menu we will have Grilled Mahi Mahi, which was marinated in Coconut Milk, garlic, ginger and lemon grass, and to accompany this we will have coconut rice and roasted asparagus. I was thinking a Thai fusion, gone Mamma style. My inspiration for this meal was the grocery store and shopping on what was fresh and wild caught in the fish market. I am against farm raised fish for several reasons, so I go natural and it is always wild caught in our house. The asparagus was on sale and I had everything else in my freezer or pantry.

    So on to the recipes:

    Grilled Thai Mahi Mahi

    1 lb Fresh, wild caught Mahi Mahi filet's
    1/4 cup light coconut milk, this is a staple in our home.
    1 tbs. thinly sliced lemon grass
    1 clove garlic, sliced
    1 tsp, freshly grated ginger.

    Combine all ingredients and marinate for 30 minutes. Preheat grill to medium heat. Grill for about 5-8 minutes per side.

    Coconut Rice

    1 1/2 cups jasmine rice
    1 14 oz can light coconut milk
    8 oz water
    1 tsp. salt
    1 tsp. brown sugar
    1/4 cup shredded coconut
    1 tbs. butter or margarine.

    Combine all ingredients in a medium sauce pan. Over medium high heat bring to a boil, stirring constantly. Once boiling, reduce heat to low and cover pan. Cook on low for 25 minutes. Remove from heat. May be served immediately or kept covered off heat for up to one hour.

    Roasted Asparagus

    2 lbs asparagus, cleaned and trimmed
    olive oil
    kosher salt
    pepper

    Place cleaned and trimmed asparagus on a low rimmed baking pan. drizzle with olive oil and season with salt and pepper. Roll around pan to coast evenly. Roast at 350* for 25 minutes, or until tender and tips are golden brown. Serve immediately.

    Enjoy and Cheers, from my family to yours.

    Saturday, January 15, 2011

    Berry Heaven


    So, I do realize we are in the midst of winter, but the grocery store had berries on sale, so what better to make with berries then a cobbler. I have yet to attempt making a Gluten Free Cobbler but here we go. No better time, than the present.

    This recipe should work easily with whatever berries you have on hand, even frozen ones. I like to serve my cobblers warm from the oven with vanilla ice cream on top.

    Filling:

    3 cups, assorted berries, I used 2 6 oz. baskets of blackberries and 1 6 oz basket of blueberries.
    1/2 cup sugar
    2 tbsp. tapioca
    1/8 tsp. ground cinnamon
    1/2 cup water
    1 1/4 tsp. lemon juice.

    Topping:

    1 cup Gluten Free Bisquick, pancake and baking mix
    1/4 cup almond flour
    1/8 cup sugar
    1/4 cup cold butter or margarine, cut into chunks
    1/2 cup milk, soy milk will work fine
    1 whole egg, plus 1 egg white, beaten
    1/4 tsp. vanilla

    Preheat oven to 350* place rinsed berries in a 9 inch baking pan, set aside.

    Whisk together remaining topping ingredients, sugar, tapioca, cinnamon in a sauce pan. Add water and lemon juice. Bring to a boil over medium-high heat. When the mixture is bubbly and thick, pour over berries int he baking pan, and set aside.

    In a mixing bowl, combine Bisquick, almond flour and filling sugar. Cut in the butter with a pastry blender or fork. Stir in milk, eggs and vanilla. Drop by spoon full over berries.

    Bake at 350* for 30 minutes, until golden brown on top. Cool 5 minutes.

    Friday, January 14, 2011

    Butternut Squash Soup, That is what's for dinner!


    Looking for a different idea for soup, that's naturally Gluten Free. Winter Squash, specifically Butternut Squash makes a incredible creamy and dreamy soup.

    Yield: 4 to 6 servings

    4 tlbs. butter
    1 large shallot, finally chopped
    1 large butternut squash, about 3 lbs, cut in half length wise, seeds and strings scraped out.
    6 cups, water or GF chicken stock
    1 tsp. salt
    1/2 cup heavy cream
    1 tsp. brown sugar
    pinch of ground nutmeg

    In a shallow baking pan, place butternut squash skin side down, add a little water to the bottom of the pan and roast for 40-60 minutes at 350*, until tender. Remove from oven and cool until able to handle. Scrape flesh from skins and discard skins. Set flesh aside.
    Melt butter in a large pot over medium heat. Add the shallots, stirring frequently, until translucent, about 3 minutes.

    Add the squash to the pan and stir to blend. Add the water or chicken stock and simmer for about 20 minutes. Add brown sugar, salt and nutmeg. Stir to combine. Using an immersion blender, puree the soup until desired consistency. Add the cream and warm over low hear. Serve immediately. Soup can be refrigerated in an airtight container for several days. Warm over low hear until hot, do not boil.

    Serve with your favorite GF bread or a nice salad.

    Tuesday, January 11, 2011

    For the love of Chocolate and Zucchini

    Though the days of summer are over and we are in the midst of a cold winter, I happen to have some zucchini in the refrigerator. Now what could I do beside sauteing it, which I have done twice this week and actually get my kids to eat it. Ah, Zucchini Bread and what's not better than chocolate with zucchini. Now many of you probably ate zucchini bread prior to living Gluten Free, but why should that stop us from enjoying the comforts of life. So my mission of the day was to make Gluten Free Chocolate Zucchini Bread and have an easy breakfast meal for the morning. So here is my recipe:

    Chocolate Zucchini Bread

    1 whole egg plus 1 egg white
    1/2 cup vegetable oil (I used 1/4 cup canola oil and 1/4 cup natural apple sauce)
    1 cup sugar (I used 1/2 cup granulated sugar and 1/4 cup agave nectar)
    1/2 tbsp GF vanilla extract
    1 cup shredded zucchini, about 1 small-medium zucchini
    1 cup gluten free flour mix (us your favorite mix for this recipe) I used Bob's Red Mill
    1/4 cup almond flour, (if you have nut allergies just substitute this for another cup of your GF flour mix)
    1/4 cup cocoa powder
    3/4 tsp. xantham gum
    1/2 tsp. salt
    1/2 tsp. baking soda
    1/2 tsp. ground cinnamon
    1/8 tsp. baking powder

    In a large mixing bowl beat eggs, oil, apple sauce, sugar and vanilla.
    Add zucchini and mix

    Add dry ingredients and mix well.

    Pour into greased loaf pan

    Bake at 350 for 50 - 60 minutes, or until bread tests done, I use the tooth pick method.

    Cool and slice

    Yield, One regular sized loaf.

    My Gluten Free Foodie Adventure

    So where shall I begin, as I sit here at my desk at home in Sonoma County, California. I am the mom of two special needs children and self-acclaimed foodie. I was diagnosed Gluten Intolerant about 9 months ago. The diagnoses came after at least 15 years of living in agony, with severe GI issues, mood swings, exhaustion, headaches..... I was told it was everything from stress to IBS. I tired everything the Dr. recommended. The symptoms were still there and I was tired of living this way. After hearing so much about GF diets, I decided to begin my own investigation, I mentioned it to my Dr. and she pretty much said I highly doubt it, but you can try and eliminate Gluten from you diet and get back to me. So here began my adventure, no more Gluten for Mamma Bananna. The Internet has been my go to place, as well as some books from the library and talking to a nutritionist friend. It was a trial and error, lots of googling, lots of label reading. I went on a GF tour of a local Whole Foods and got a list of GF items carried by Trader Joes. I didn't go out to eat and always had safe snacks with me. Within 3 days I felt so much better, a month later I went back to see my Dr. and was thrilled to share my findings. She said, OK, now lets have you eat Gluten for 2 weeks, every day. I was scared, would I feel sick again, and sure enough I did, awful. After 2 weeks I went in the blood test, which included testing for Celiacs. The tests came back with high levels for gluten intolerance, not it was not Celiacs. I needed to make a lifestyle change and off I went and have never looked back. My life in now involved with educating others about living Gluten Free. I love to adapt any recipe to make it Gluten Free, why should we have to live without when we can live healthier, happier and Gluten Free all while enjoying food. I mean, cakes, muffins, breads, comfort foods, it can be done with modification and it is all healthier and so delicious. So please join my on my journey and let's live the Gluten Free Adventure.